Linux board Hello World
Deploy the simplest Hello World to a Linux board (like a Raspberry Pi) from the IDE — build, deploy over SSH, and run. The cross-deploy workflow for Linux targets.
This is the Linux board edition of Practice 1 — deploy the simplest Hello World to a Linux board like a Raspberry Pi, in one click from the IDE.
Prerequisites
- A Raspberry Pi 4B / 5 (or any Linux board, e.g. Taishan Pi 3 or Dongshan Pi A1; this guide uses the Raspberry Pi), with an OS flashed, internet access, and SSH enabled.
- Your computer and the board are on the same LAN and you can
pingits IP. - The extension is installed and the SDK is initialized — see Install TuyaOpen IDE.
For a Linux board, the IDE uses cross-deploy: it compiles an executable on your computer, then pushes it to the board over SSH and runs it. No USB connection to the board is needed — just working network and SSH.
How a Linux board differs from an MCU board
The T5AI_Board from Practice 1 is flashed over serial. A Linux board has no serial-flashing step — once the IDE detects that the target is a Linux board, it automatically repurposes the same set of toolbar buttons:
| Top button | MCU board (T5AI_Board) | Linux board (Raspberry Pi) |
|---|---|---|
| Build | Builds firmware | Builds (produces a Linux executable) |
| Flash | Flashes firmware over serial | → "Deploy": SCPs the executable to the board |
| Monitor | Reads serial logs | → "Run": SSHes in and runs the app in the foreground |
| Clean | Clears the build cache | Clears the build cache |
The Linux board's Project Details page also gains a Board connection section (for SSH info).
Step 1: Create a Linux board project
-
Click the Board Catalogue icon in the left activity bar to browse the supported boards, chips, and SoC platforms with their full specs.
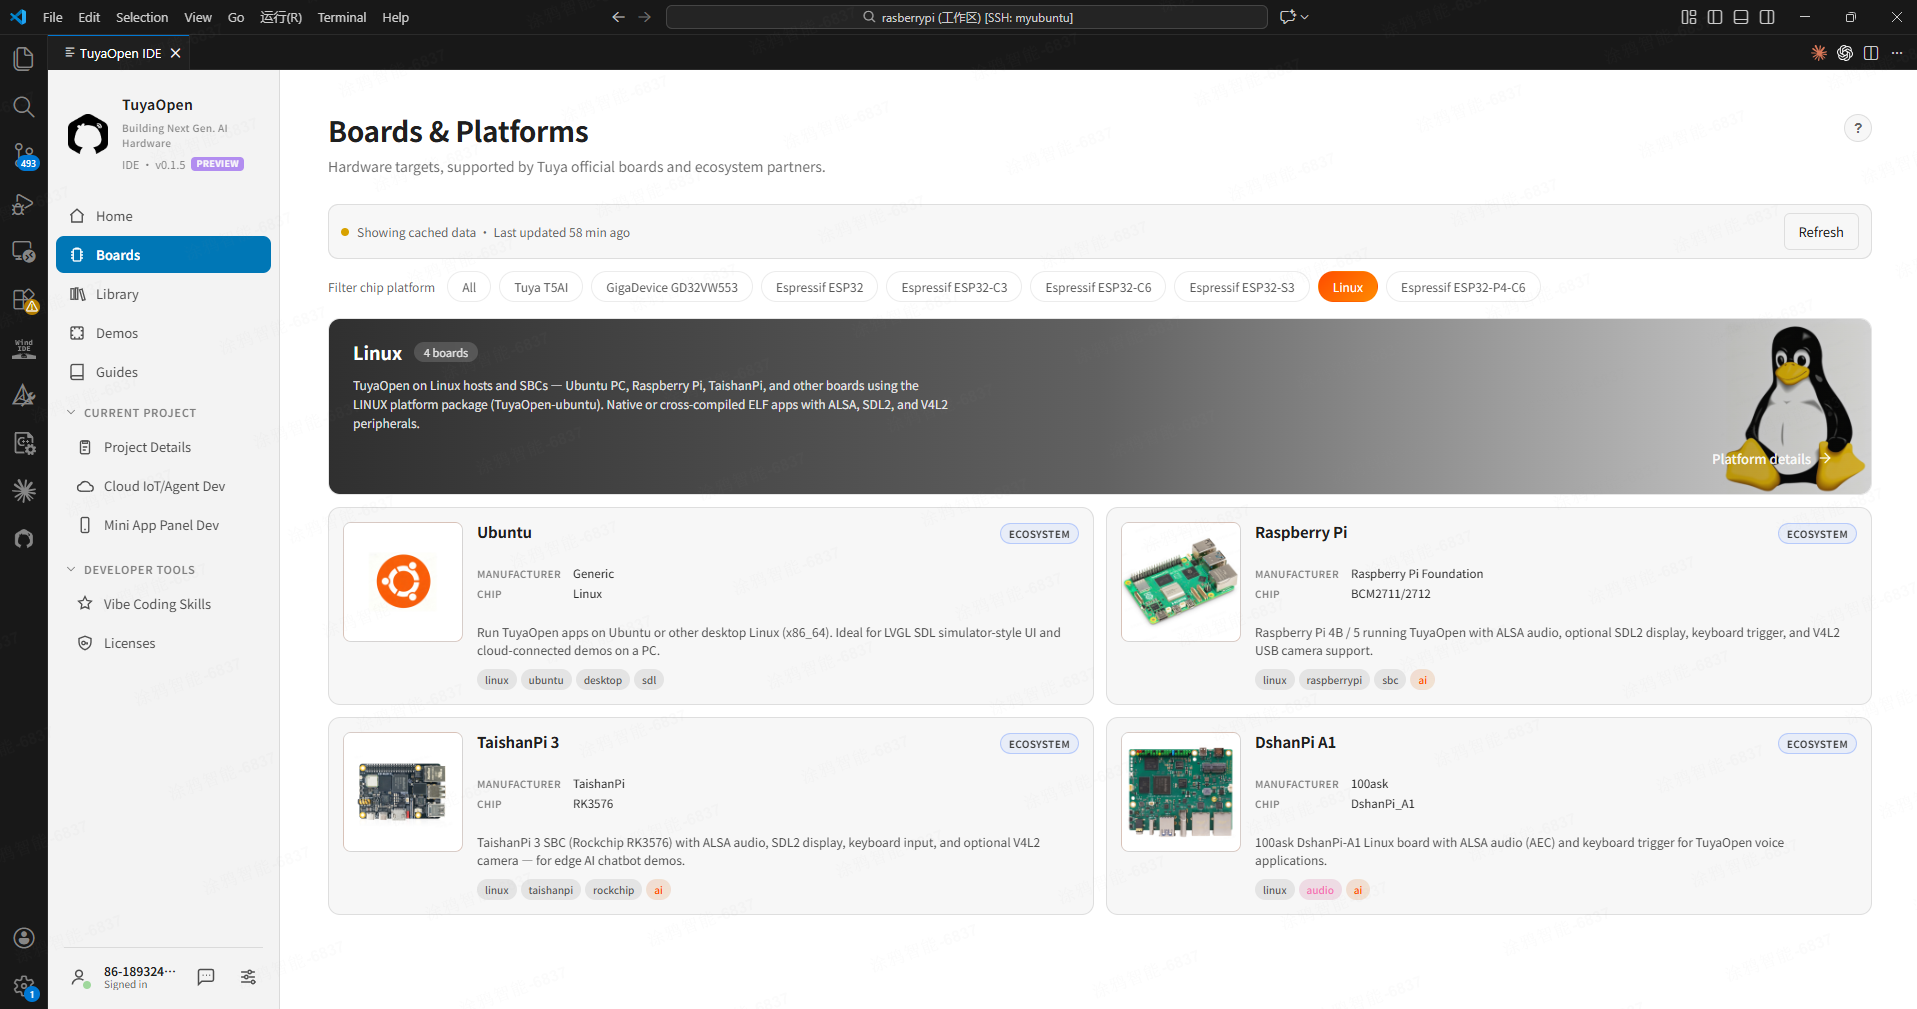
Board catalogue icon in the IDE activity bar -
Find Raspberry Pi (or your actual Linux board) in the list and click
Create project from this board.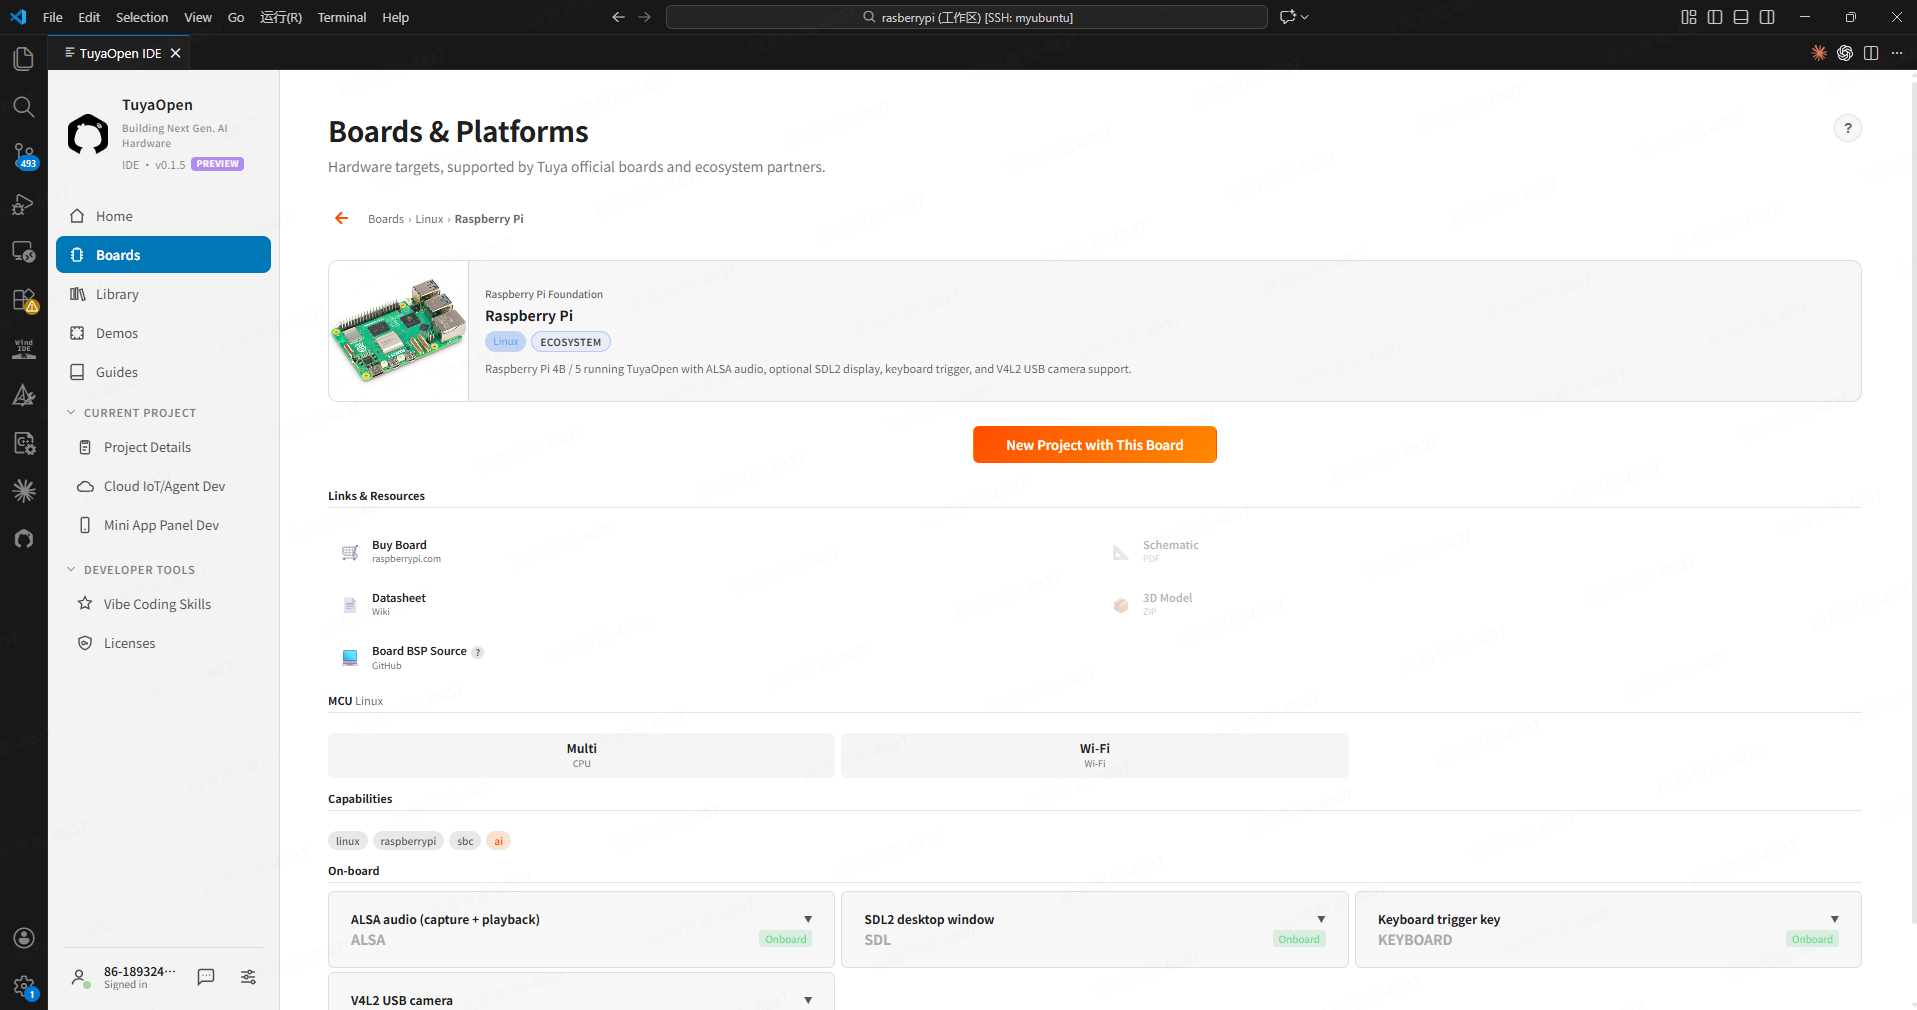
Find Raspberry Pi and create a project from the board -
Open the Project Details page and confirm that the top Flash button now reads Deploy and Monitor reads Run, with a Board connection form below — that is the sign the IDE has recognized it as a Linux board.
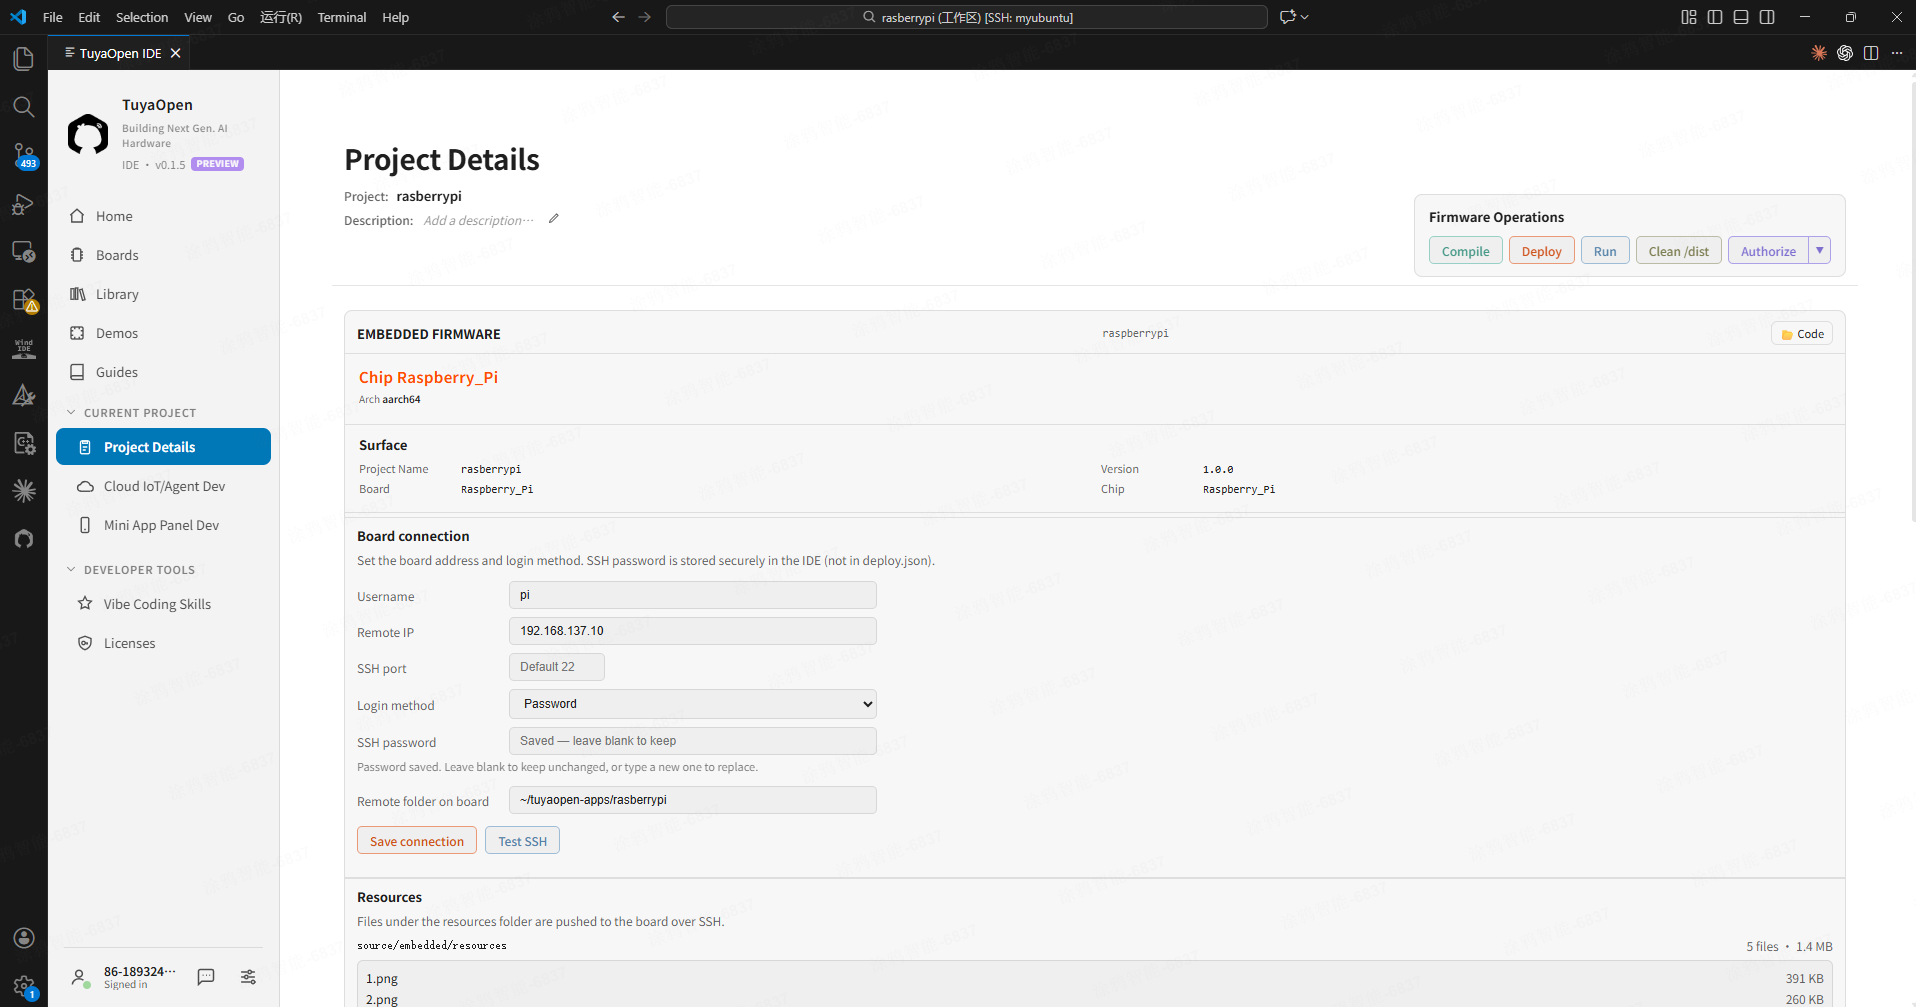
Linux board project detail — top buttons switch to Deploy/Run, board connection form appears
Step 2: Configure the SSH connection
Before filling in the form, make sure the board is powered on, on the same LAN as you, has SSH running, and that you have a working username and password.
How to get the username / IP / password: the username and password are whatever you set when you flashed the OS; for the IP, run hostname -I on the board.
Fill in the Board connection form:
| Field | What to enter |
|---|---|
| Username | The username you set when flashing the OS (e.g. pi) |
| IP address | The board's LAN IP (e.g. 192.168.1.50) |
| SSH port | Defaults to 22; leave blank if unchanged |
| Login method | Choose Password (recommended); advanced users can pick Private key |
| Password | The matching password |
| Remote directory | Where the app lives on the board. Defaults to ~/tuyaopen-apps/<project name>; usually left as is |
How to choose a login method: the "Login method" field decides which SSH authentication the IDE uses to reach the board.
- Password (default): the password is stored in the editor's secure credential store (the OS keychain — never written to disk, never placed in the project files). If
sshpassis installed on your machine, the IDE reuses the stored password automatically and you never have to type it; multiplessh/scpcalls within the same operation even reuse a single connection, so you are not prompted repeatedly. - Private key (advanced): authenticates with an SSH key instead of a password. The IDE defaults to
~/.ssh/id_rsaand lets you pick another key file in the config; the corresponding public key must already be registered in the board's~/.ssh/authorized_keys.
Fill it in, click Save connection, then click Test SSH. On success it prints:
SSH OK
Linux raspberrypi 6.x.x ... aarch64 GNU/Linux
pi
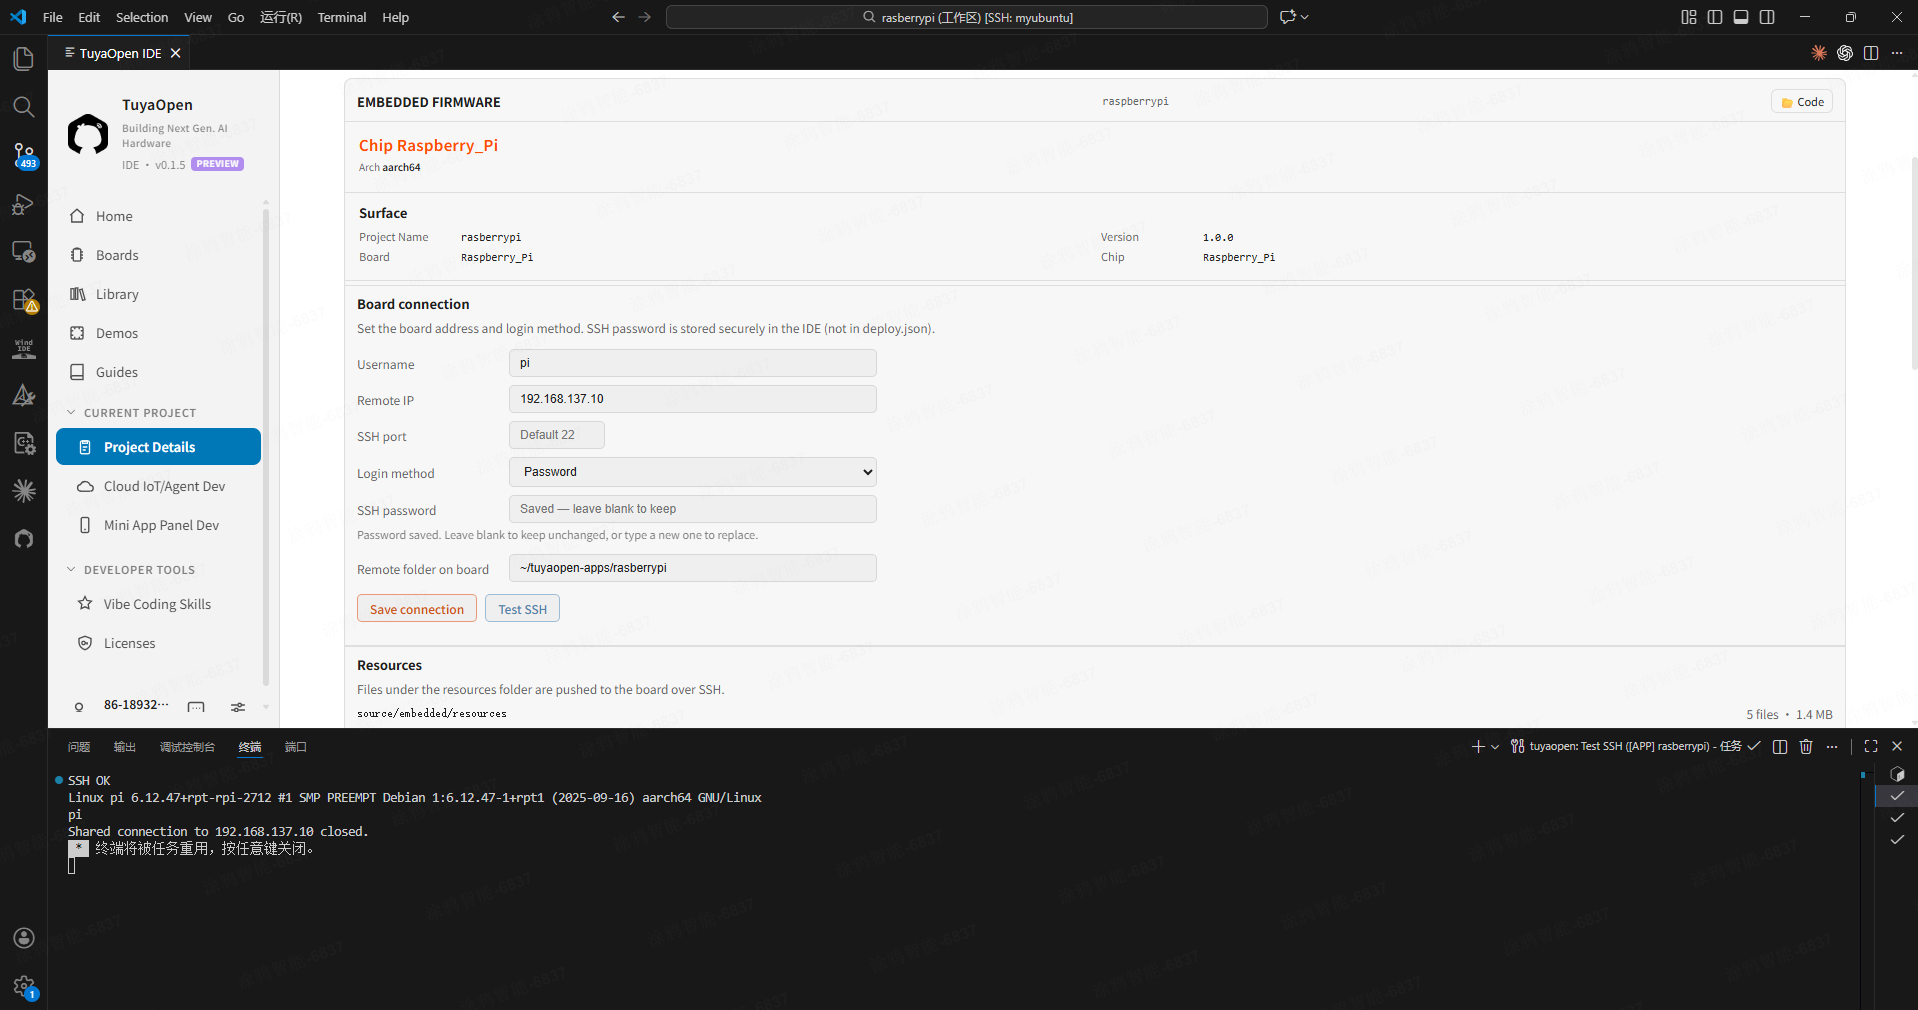
Seeing SSH OK plus the kernel info and the login user means you are connected. If it fails, the IDE gives a categorized hint — for an auth failure, double-check the username and password; for a network problem, ping <IP> first; for a first-connection host-key issue, run ssh <username>@<IP> once on your computer to confirm it.
The password goes into the editor's secure credential store (not on disk); the rest of the connection info lives in the project's .tuyaopen/ide/deploy.json. You can also configure it via the command palette command TuyaOpen: Configure Board SSH / Deploy.
Step 3: Build
Click Build at the top. On success it produces a Linux executable (.elf), which the Project Details firmware area lists as "Application (ELF)".
Expected output (build success):
[NOTE]:
====================[ BUILD SUCCESS ]===================
 Target    : <project name>_QIO_1.0.0.bin
 Output    : /home/<your-username>/TuyaOpenIDE/projects/<project name>/source/embedded/dist/<project name>_1.0.0
 Platform  : LINUX
 Chip      : Raspberry_Pi
 Board     : Raspberry_Pi
 Framework : base
========================================================
Hello World depends on no model or cloud credentials, so the build output is a clean Linux executable — no auth code or extra assets required.
Step 4: Deploy
Click Deploy at the top. The IDE deploys to the remote target machine over an SSH channel:
Expected output (deploy success):
>>> Uploading ELF…
>>> Deploy complete.
>>> Remote path: /home/pi/tuyaopen-apps/<project name>/<project name>_1.0.0.elf
>>> Local path: /home/<your-username>/TuyaOpenIDE/projects/<project name>/source/embedded/dist/<project name>_1.0.0/<project name>_1.0.0.elf (<size> bytes)
If it says ".elf file not found — build the project first", go back to Step 3 and rebuild.
Step 5: Run
Click Run at the top (the same spot as the MCU board's Monitor button). The IDE opens a dedicated terminal, logs into the board over ssh -t, and runs the executable in the foreground; its output streams here in real time.
Expected output (app startup):
[01-01 00:00:00 ty N][sample_project.c:38] Application information:
...
[01-01 00:00:00 ty D][sample_project.c:48] hello world
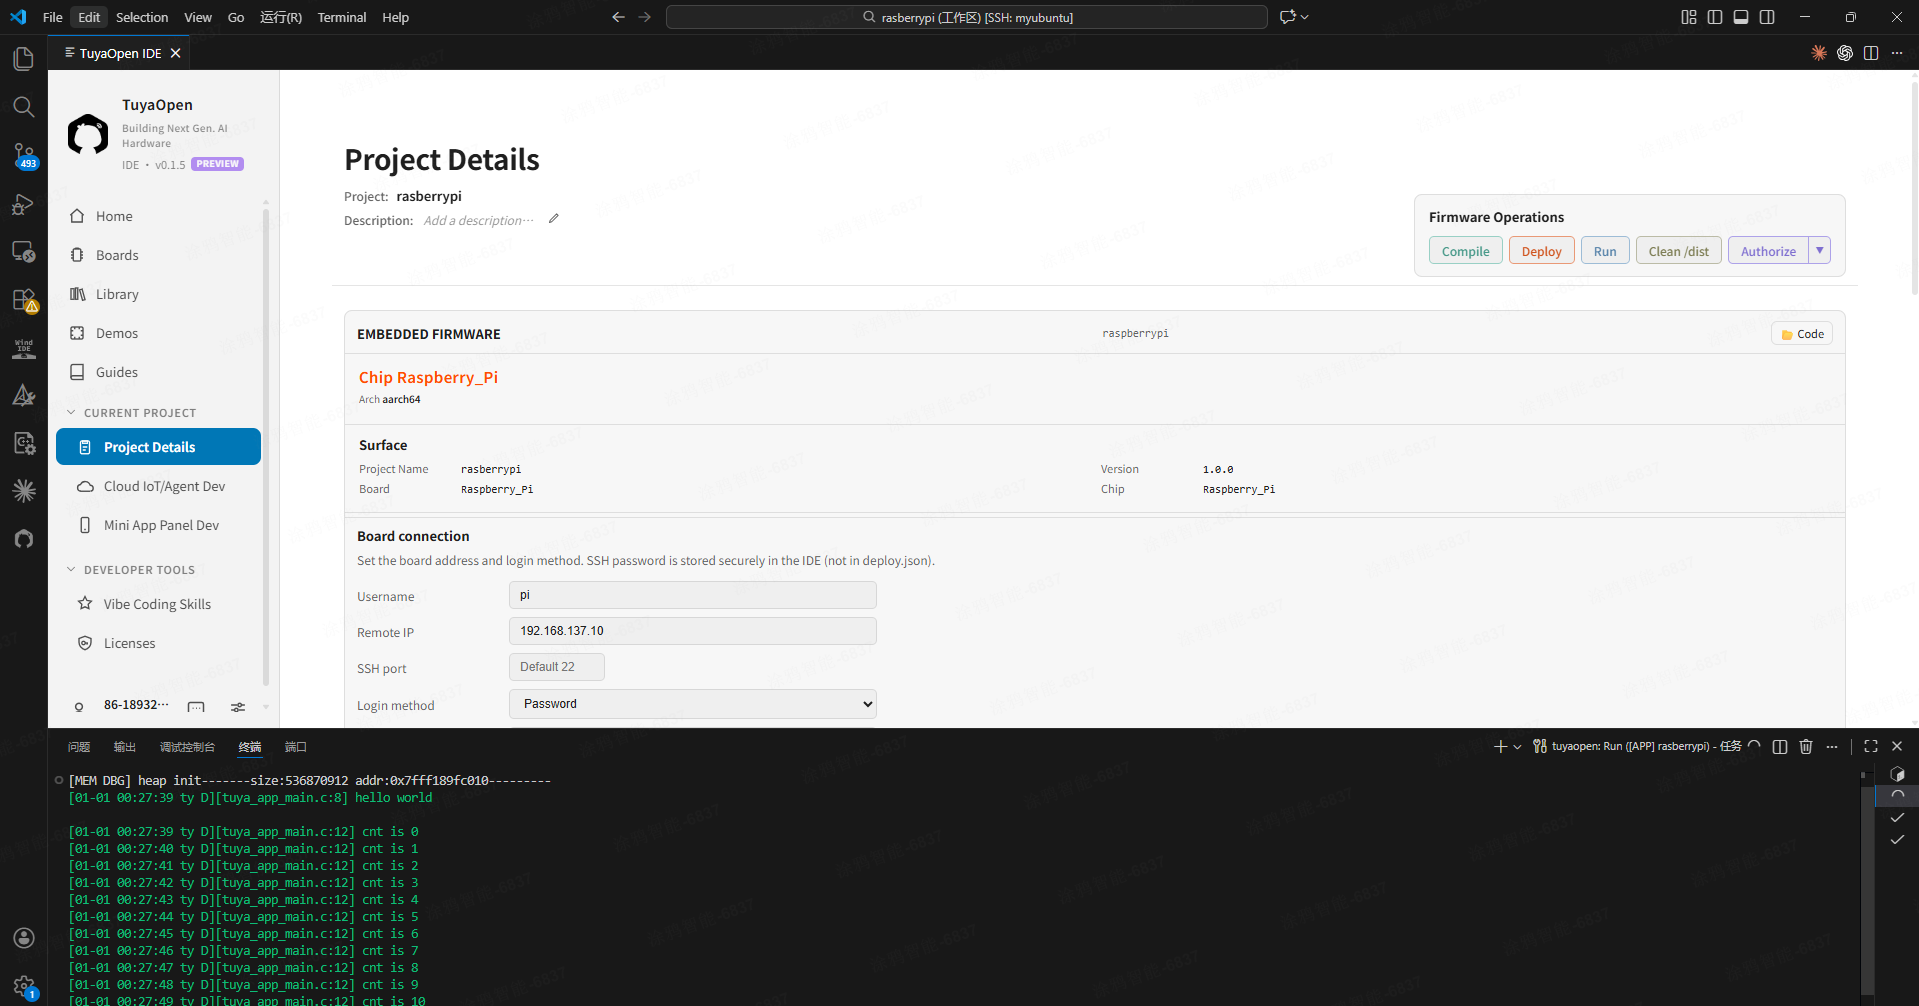
When you see hello world at the end, you are done. After printing its info, the app enters a resident loop and keeps running; to stop it, press Ctrl + C or close the terminal.
Bonus: push resource files (images, videos, …) to the board
Beyond the program itself, the IDE can push your project's resource files — images, videos, 3D models, and so on — to the board in one click, saving you a manual scp.
-
Put the resource files in the project's
source/embedded/resources/directory (you can create subdirectories; the IDE uploads recursively and preserves the structure). -
Run
TuyaOpen: Upload Resources to Boardfrom the command palette (Ctrl+Shift+P), or click theUpload Resourcesbutton.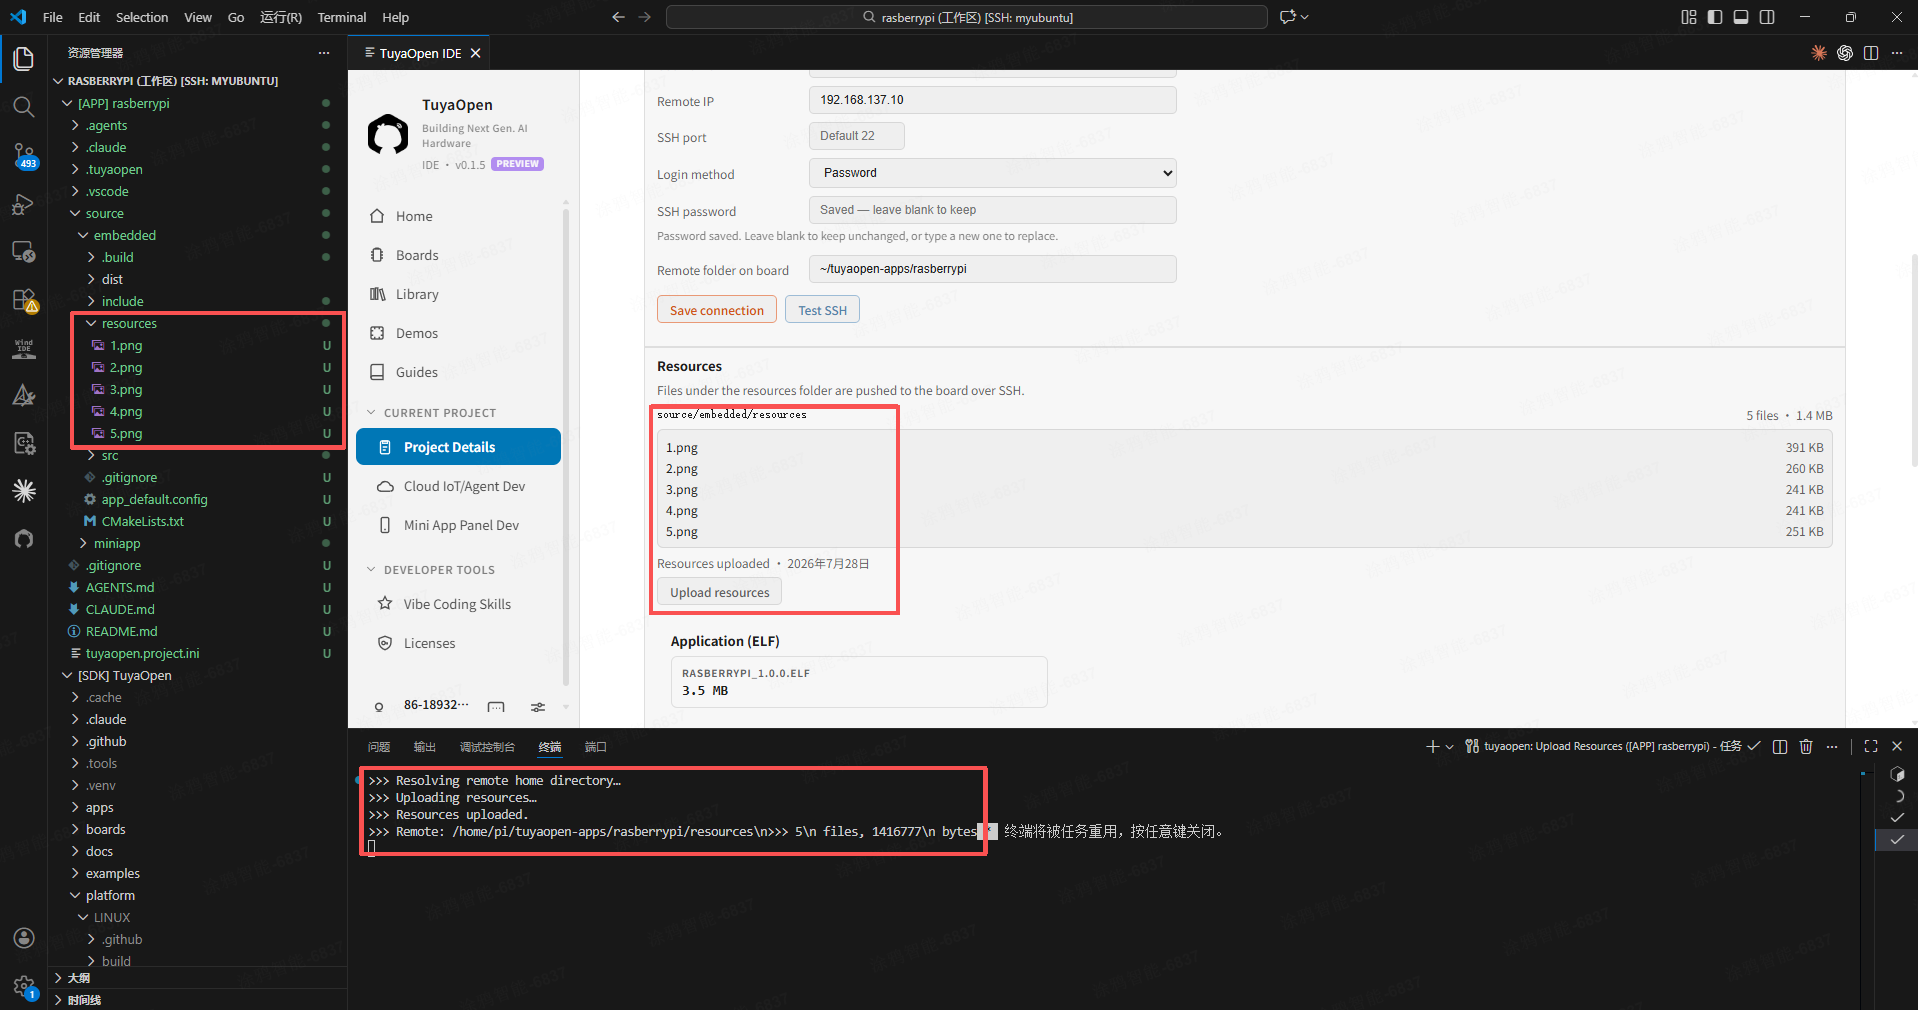
Resources directory source/embedded/resources/ and the "Upload Resources to Board" command
The resources land under <remote directory>/resources/ on the board (default ~/tuyaopen-apps/<project name>/resources/); for example, a local resources/hero.glb becomes ~/tuyaopen-apps/<project name>/resources/hero.glb on the board.
When source/embedded/resources/ is empty, the IDE reports "no resource files" and uploads nothing. This feature is for Linux boards only (cross-deploy).
Debug with Ubuntu (X86)
Besides the Raspberry Pi (ARM/aarch64), the IDE also supports Ubuntu as a Linux deploy target — it is an X86_64 "Linux board". The flow is identical to the Raspberry Pi (both are cross-deploy: build the ELF → deploy over SSH → run); only the build target's architecture differs. When creating the project, pick Ubuntu as the board type, then follow from Step 2 onward.
Why use it for debugging:
- A Linux stand-in when you have no real ARM board — if you don't have a Raspberry Pi or Taishan Pi at hand, use an Ubuntu (X86) machine, VM, or cloud server as your "Linux board" to get the app logic and the "build → deploy → run" loop working first, then port to the real board without waiting for hardware.
- See the UI right on the desktop — on an Ubuntu desktop, the LVGL UI renders in an SDL2 window, so you can tune the UI without a real display attached.
- X86 is easy to set up and reproduce — VMs, containers, and cloud hosts all work; they snapshot and reproduce well, which suits application-layer debugging and automation.
The build output is an X86_64 ELF and only runs on X86 Ubuntu; when porting to a real ARM board, remember to switch back to that board type and rebuild — different architectures are not interchangeable.
FAQ
- You want password-free login / it says sshpass is missing — for non-interactive use under the password method, install
sshpasson your machine (macOS: Homebrew; Linux: package manager; Windows: WSL); once detected, the IDE reuses the stored password automatically. - Deploy says ".elf file not found" — go back to Step 3 and build first, and confirm the artifact was produced.
- You changed code and need to redeploy — order: Build → Deploy → Run.
Next step
You have deployed a program to a Linux board in one click and run through the Linux board's "build → deploy → run" workflow. Go deeper:
| What you want to do | Where to go |
|---|---|
| Drive GPIO / I2C / SPI / UART peripherals on the Raspberry Pi | Raspberry Pi peripheral examples |
| Switch to another Linux board (Dongshan Pi A1 / Taishan Pi 3 / Ubuntu) | Just pick the corresponding board type when creating the project; the flow is the same |
| Raspberry Pi 40-pin pinout reference | Raspberry Pi 5 GPIO Reference |
| Go further: deploy a cloud-connected AI voice app | Practice 2: your_chat_bot |